If your little girl is obsessed with all things pink, princesses and magical lands far far away, this princess castle cake tutorial is going to have them tickled pink!
A princess tea party is a fun and whimsical way for little princesses to feel like royalty for the day. Our princess tea party invitations will certainly bring your little princesses’ royal dreams to life.

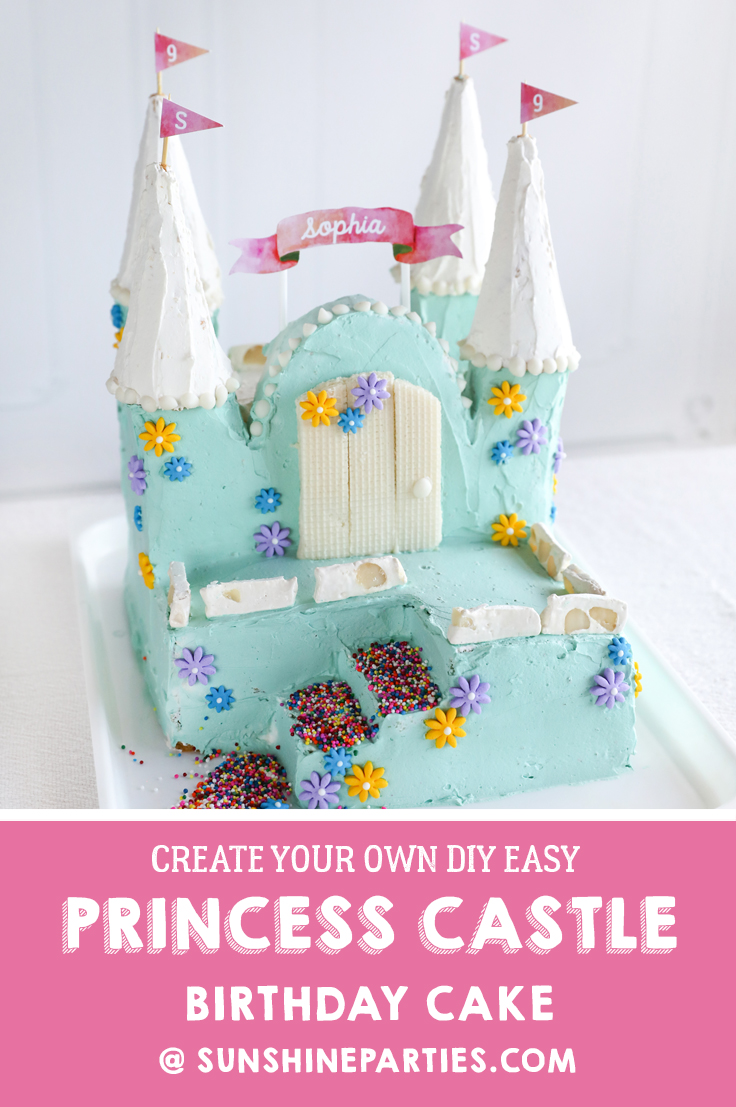
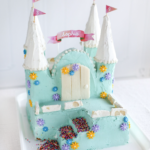
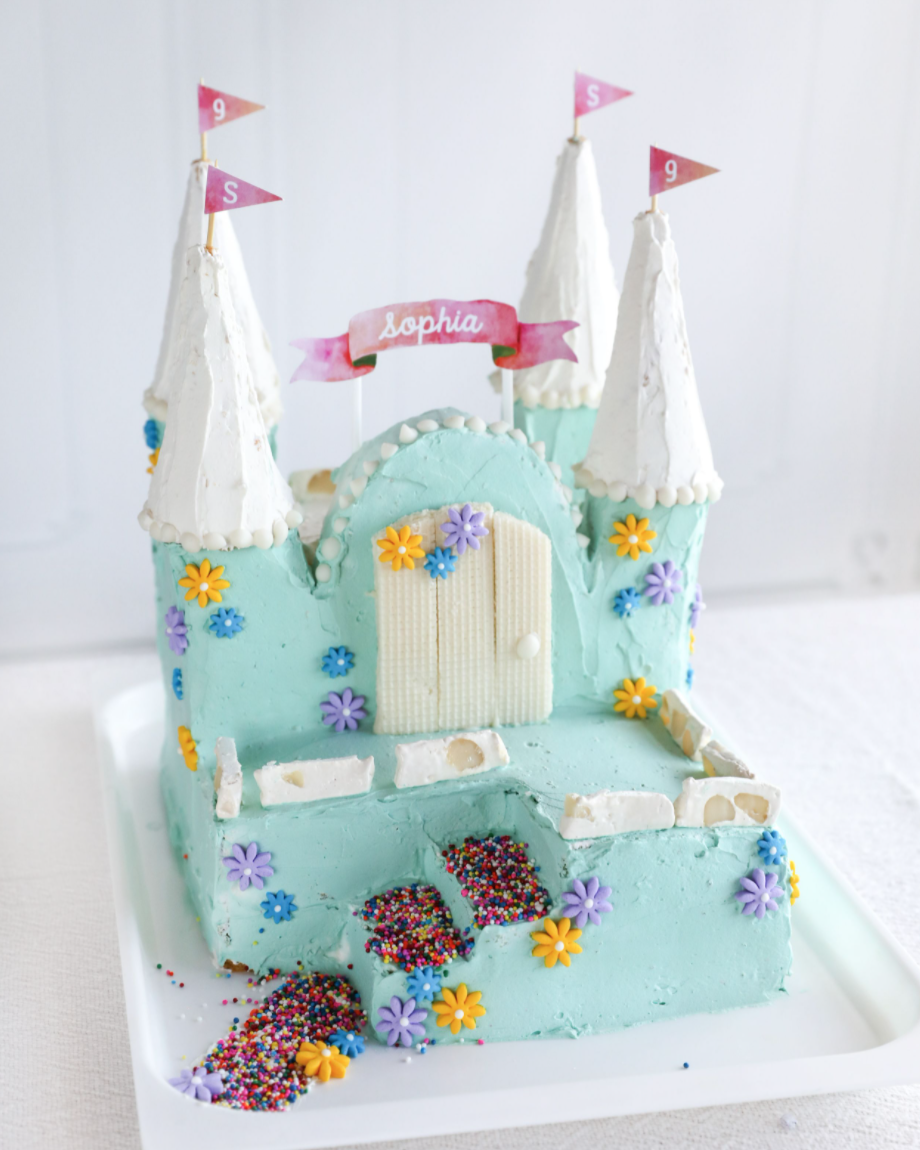
A princess tea party wouldn’t be complete without an extraordinary cake fit for a queen! Behold this beautiful princess fairy castle cake that looks a lot more complicated to make than it actually is. Want us to share the secret with you? Ok, here it is. This magical masterpiece is in fact made from store-bought cakes! Zero baking was required to bring this fairy princess cake to life! Not only is it a beautiful cake, it also tastes fantastic! The little princesses will most certainly approve.
Before you feel overwhelmed by the steps, don’t be…it’s super easy! Check out our youtube video below to watch all the steps being done. Feel free to pause and rewind when you need to!
How to create your Princess Fairy Castle Cake from a store-bought cake:
You will need:
- 2 x Rectangle store bought cakes
- 1x Blue food coloring (we used gel food coloring)
- 1x bag White chocolate drops
- 4x sugar cones
- 1x bag colored sprinkles
- 1x nougat bar
- 1x packet of wafer biscuits
- 1 x pack of mini swiss rolls
- Variety of mini sugar flowers in mixed colors
- Wooden skewers
- Wooden toothpicks
- SunshineParties Printable Cake Banners + Flags
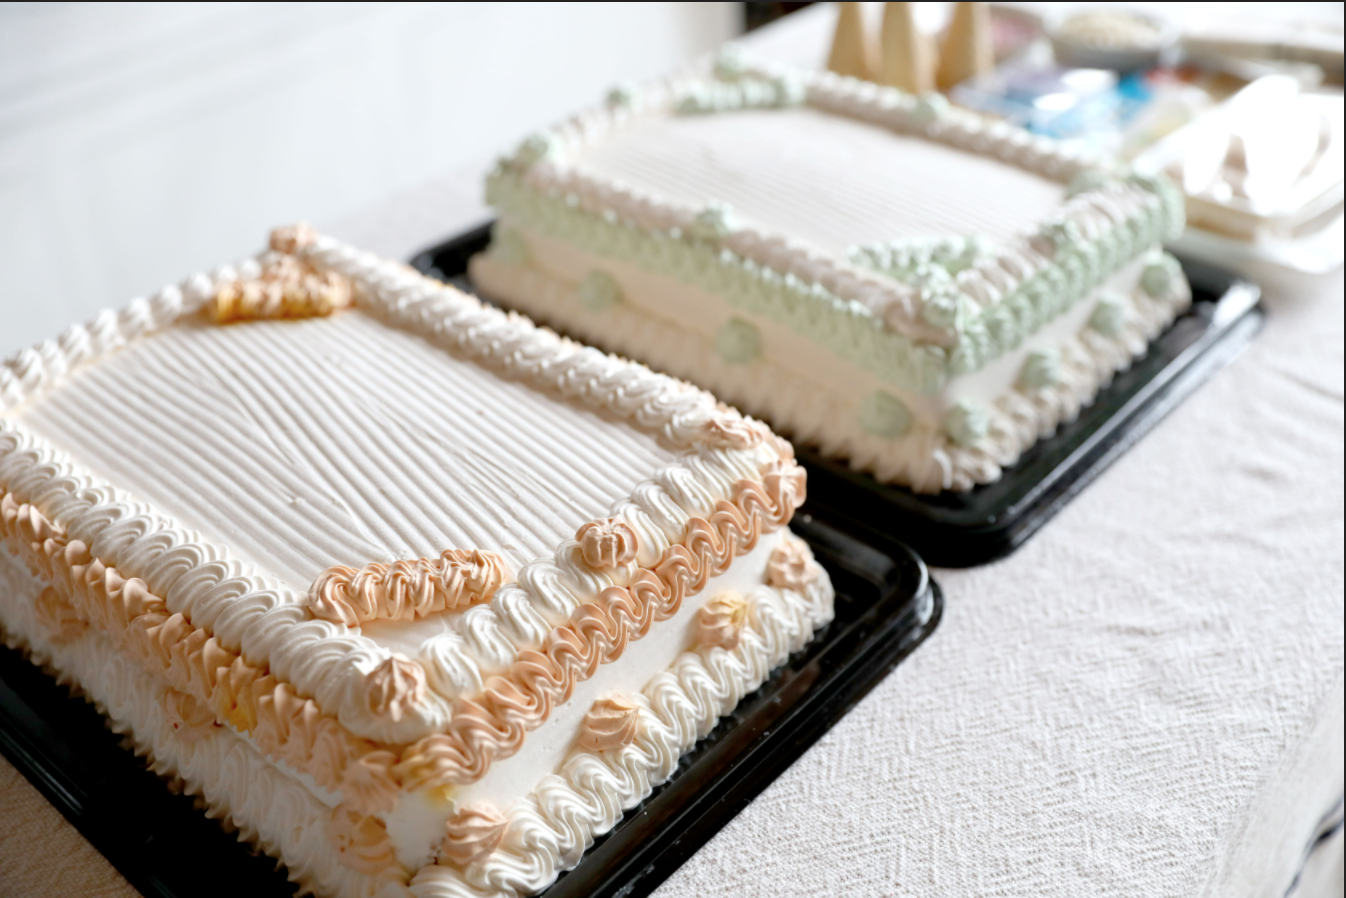
Scrape off all the store frosting from the cakes with a pallet knife and place in a bowl for later.
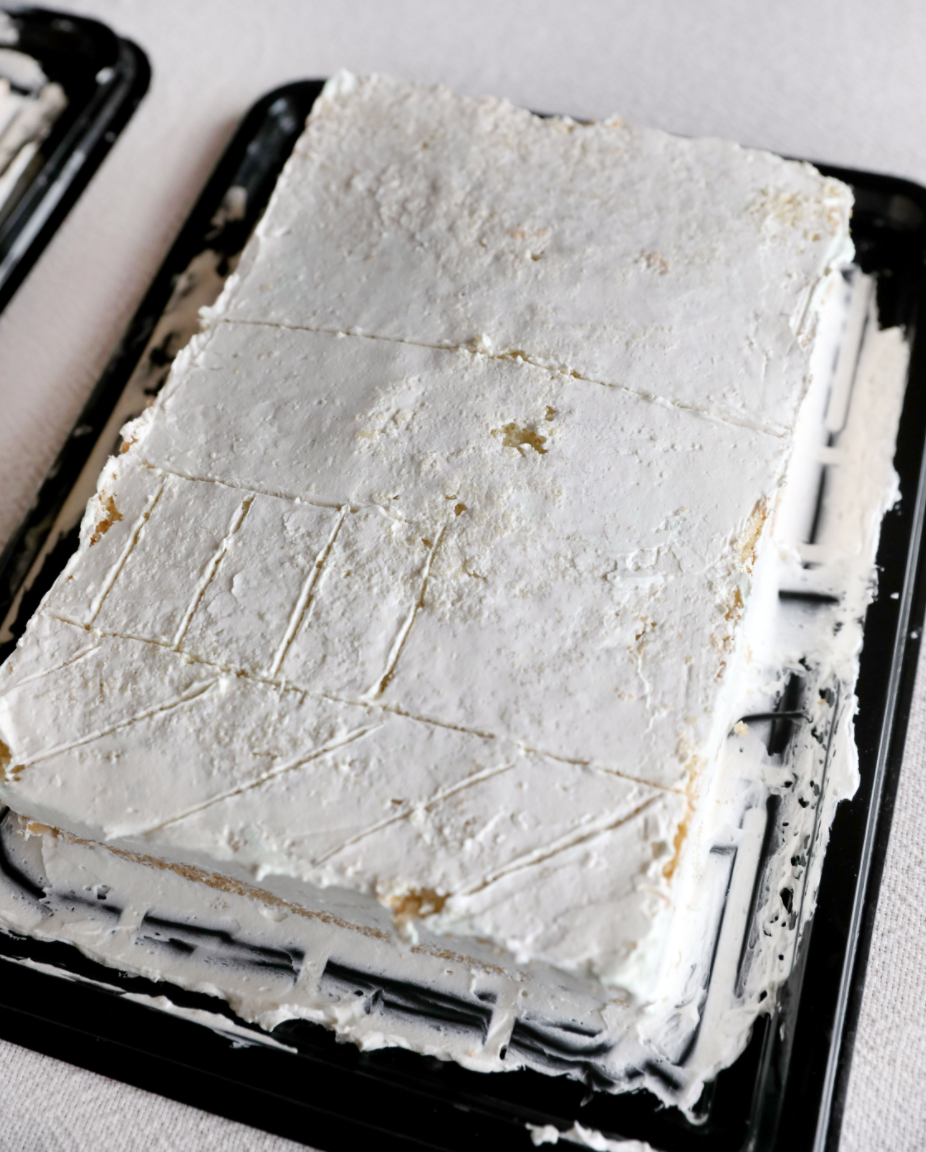
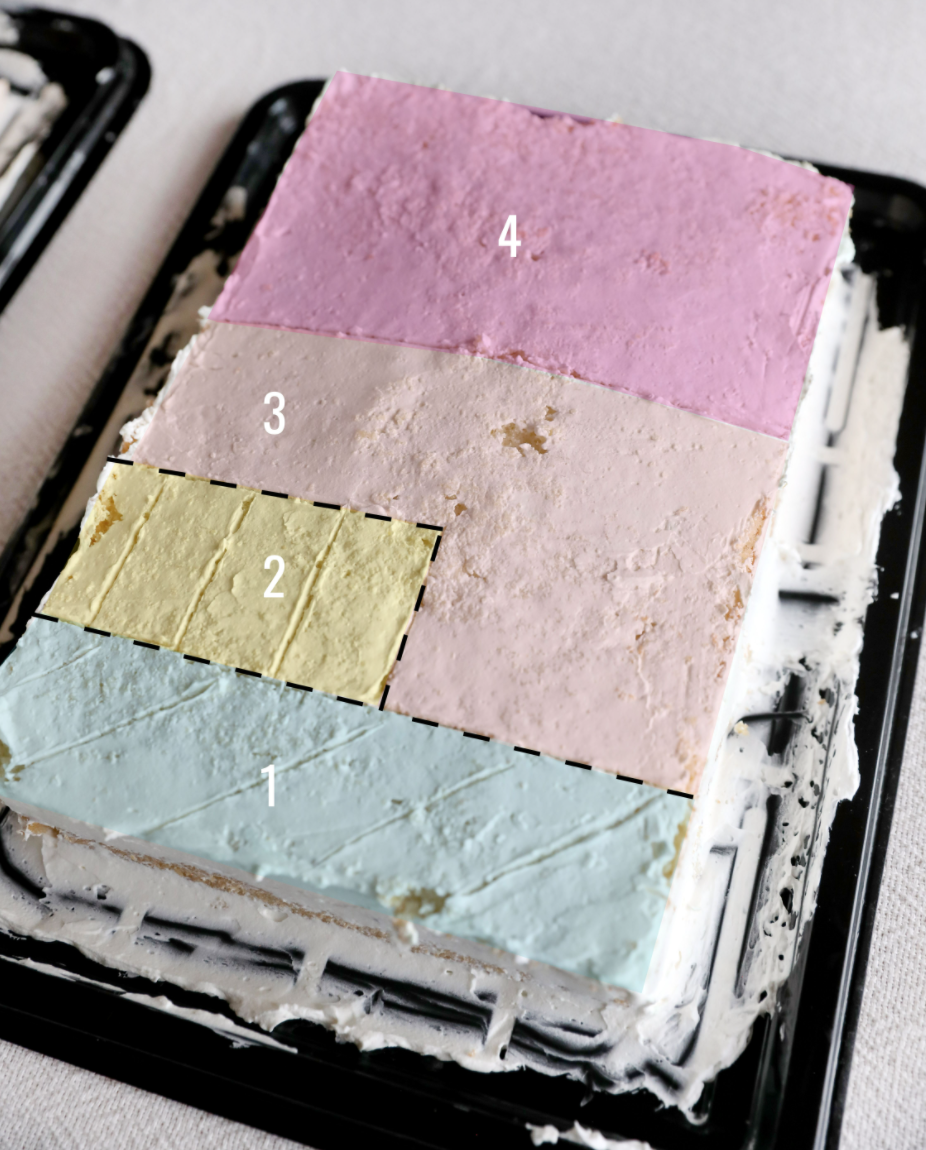
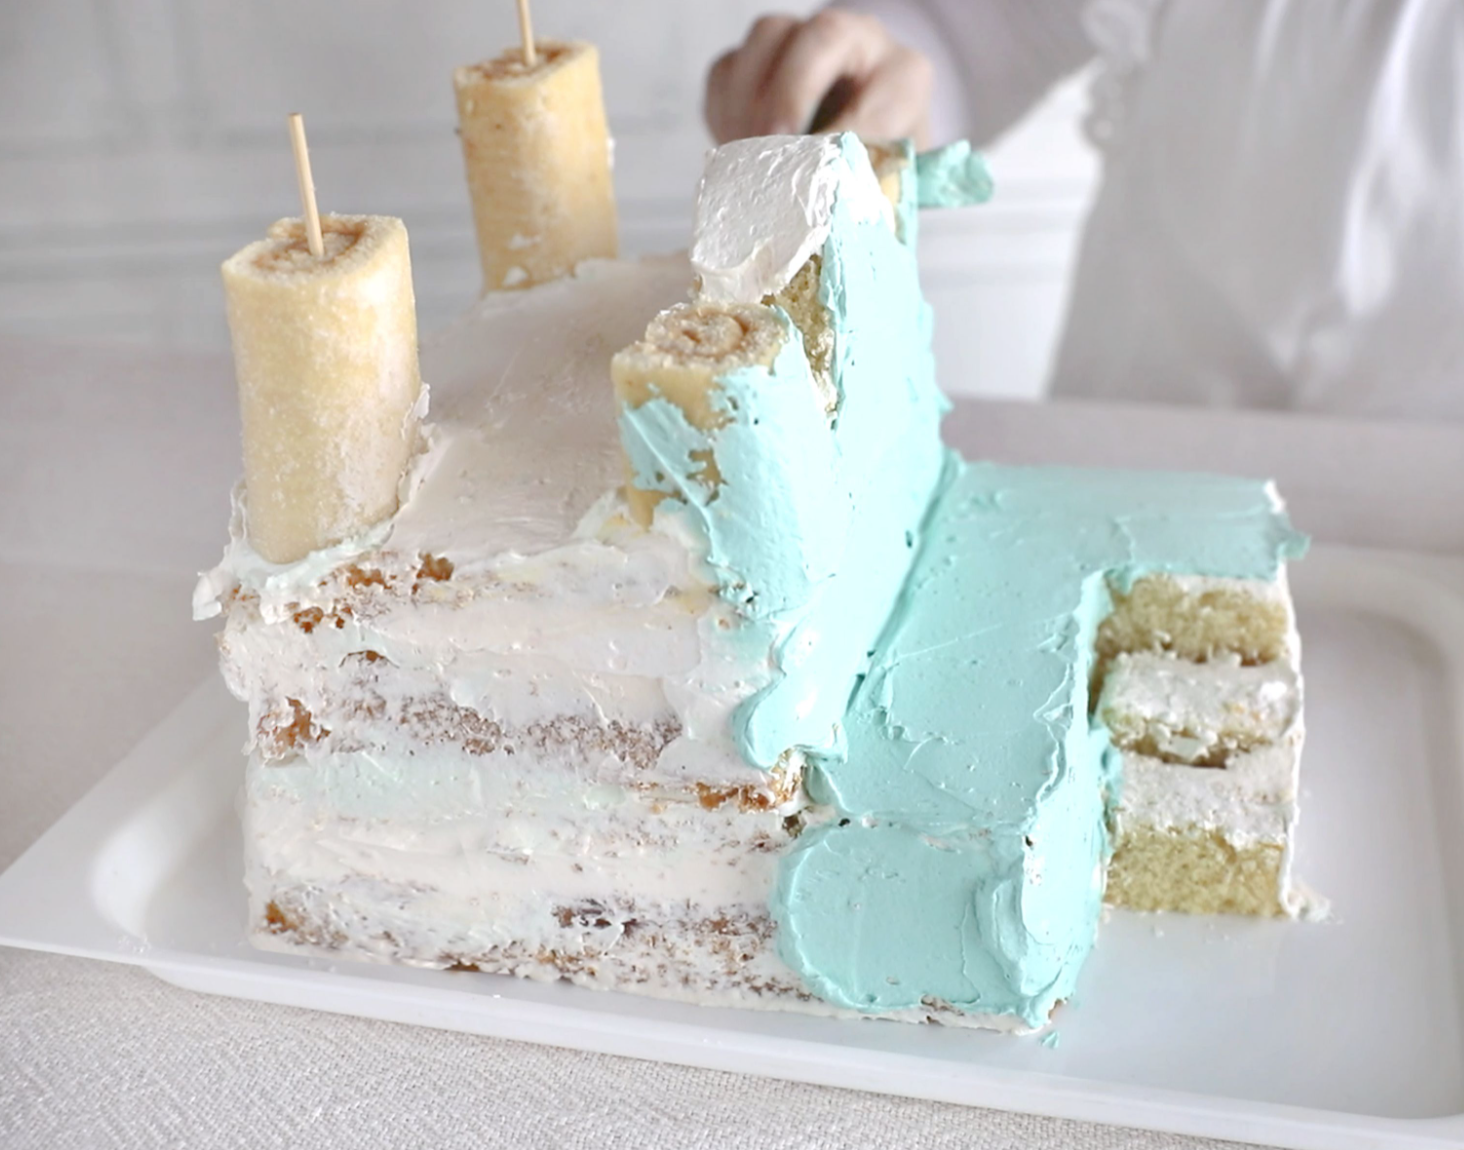
Now it is time to cut up one of your rectangle cakes to suit the size and proportion of the castle cake. I have highlighted the cake sections in different colors for you to see how we cut up the cake below. We do recommend drawing lightly on the cake first with a toothpick or skewers, before you cut, to make sure you are happy with the sizing.
Blue Section 1. Discard this section, and use it as a tea time treat while you are making the cake.
Yellow Section 2. Separate this section completely from the cake, cut along the black dashed line, this is to form the stairs you will put back in place later. We cut it into 4 pieces and then cut each of the form pieces down height a little more than each to form the stepping height of the stairs. We only put 2 stairs back on the cake.
Peach Section 3. With this section you ONLY cut along the black dashed line to form the front balcony for this section.
Pink section 4. This section at the back is not cut off but you just mentally separate the back section, so you know how much of the second cake you need to cut off to place on top of section 4.
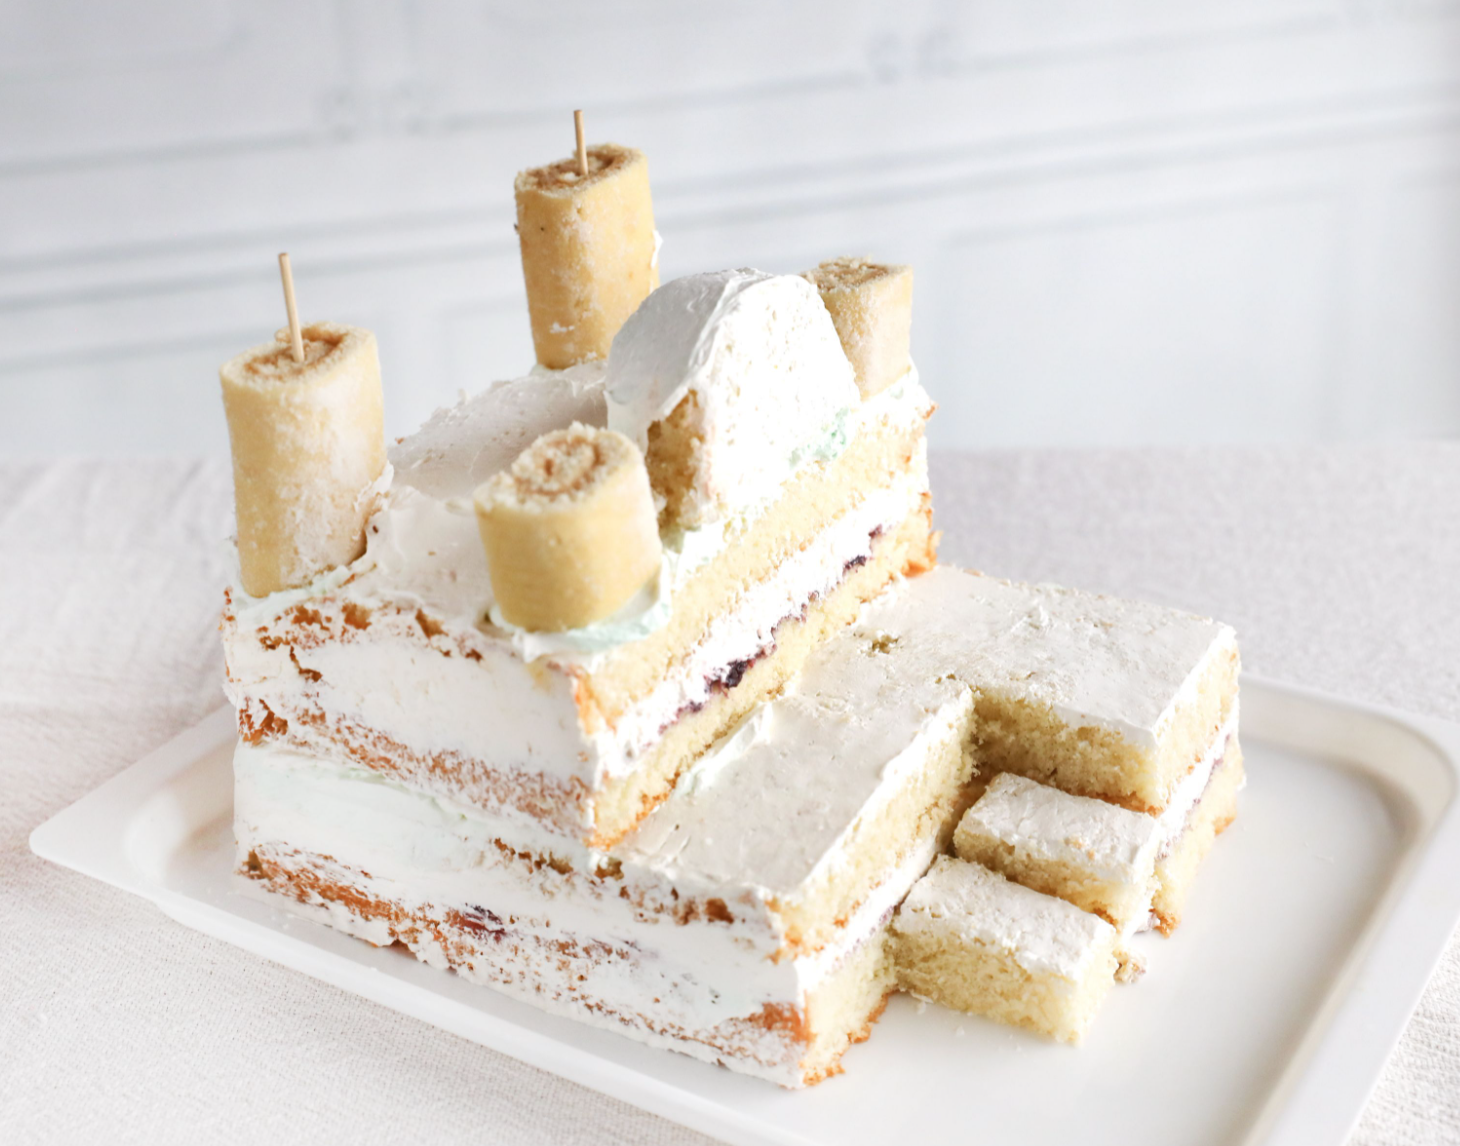
Now to cut up your second rectangular cake. Cut a piece the same size as section 4 and place it on top of section 4 so you can get your back height.
You will have left over cake from your second cake. Now with a leftover piece, cut a semi-circle shape and place it on the flat edge, front and centre of the second layer of section 4 of the cake.
Take out your mini swiss rolls. Cut 1 mini swiss roll in half and place each half either side of the semicircle you just placed in the front of section 4.
Now take two full mini swiss rolls and place 1 full mini swiss roll at the back of each corner of section 4. I would suggest putting a wooden skewer through the centre of each of these swiss rolls for support.
Now take the white frosting you have left from scraping the cake clean in the beginning. Place white frosting in between the towers and on top of the arch. Then take about 2 tablespoons of white frosting and keep it aside for icing the white towers later.
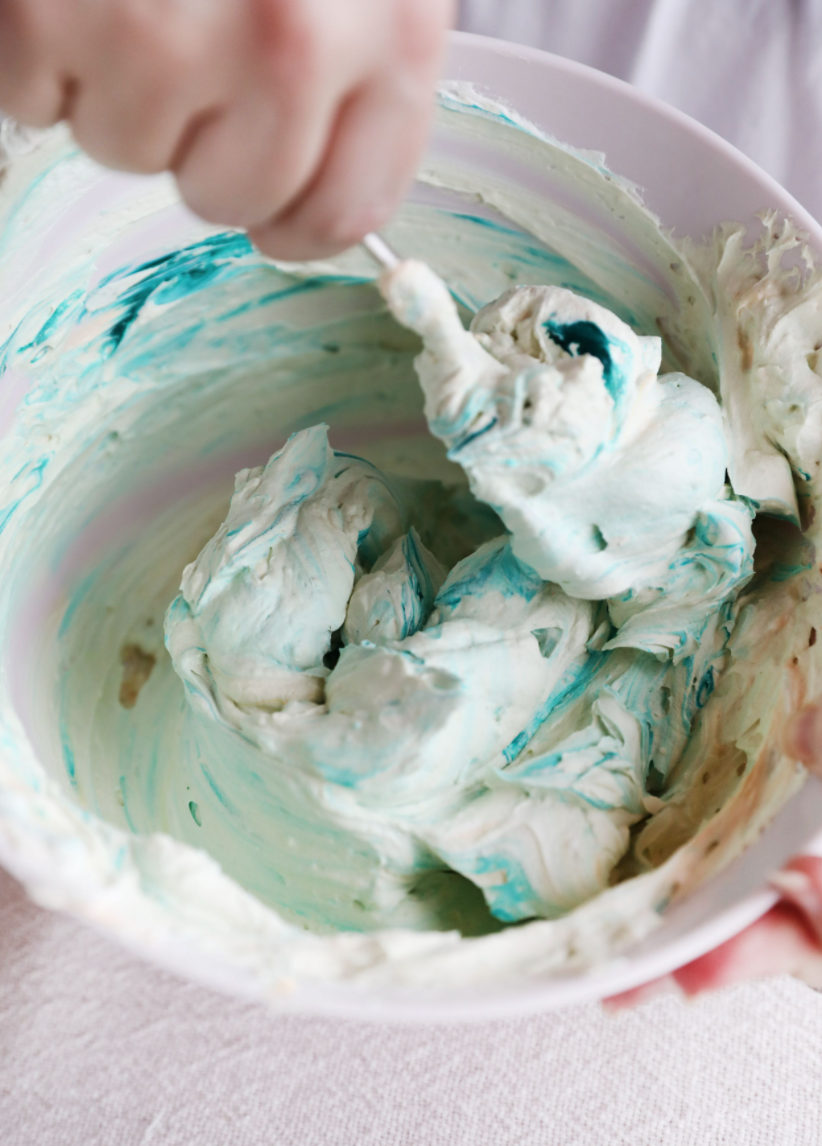
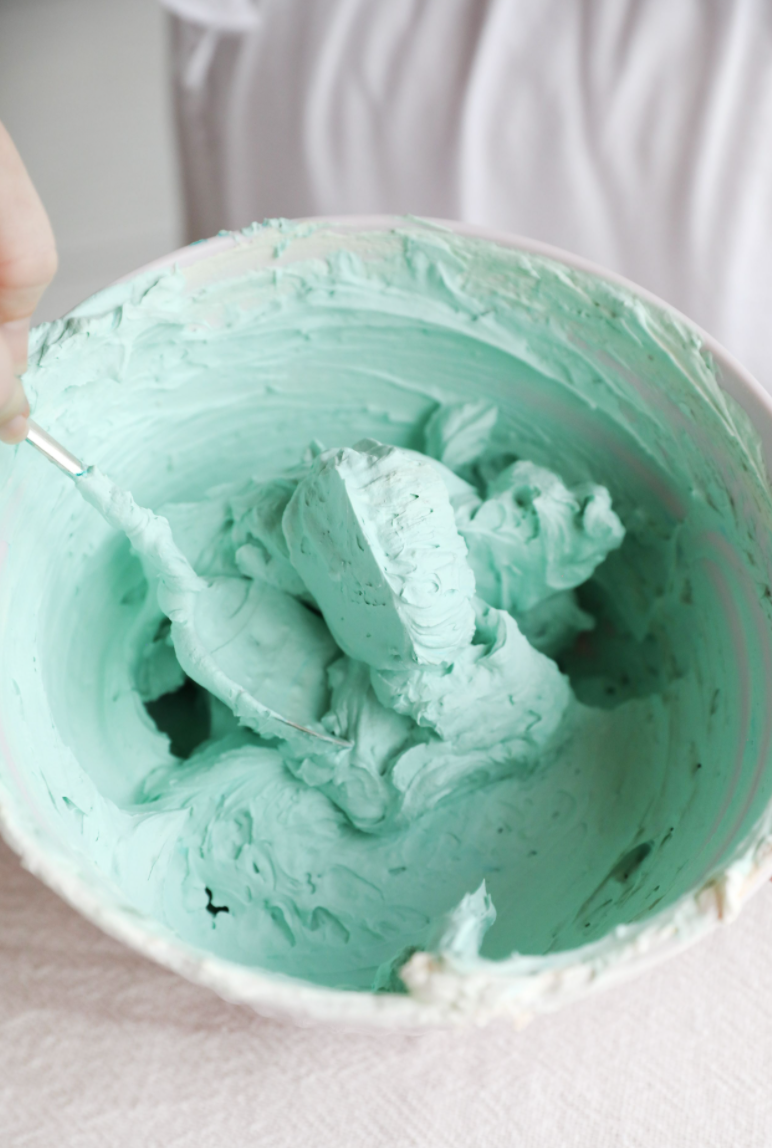
Take the rest of the cake frosting and add some turquoise blue food coloring. Mix the food coloring in well until you get an even color.
Now to place the blue frosting all over the rest of the cake.
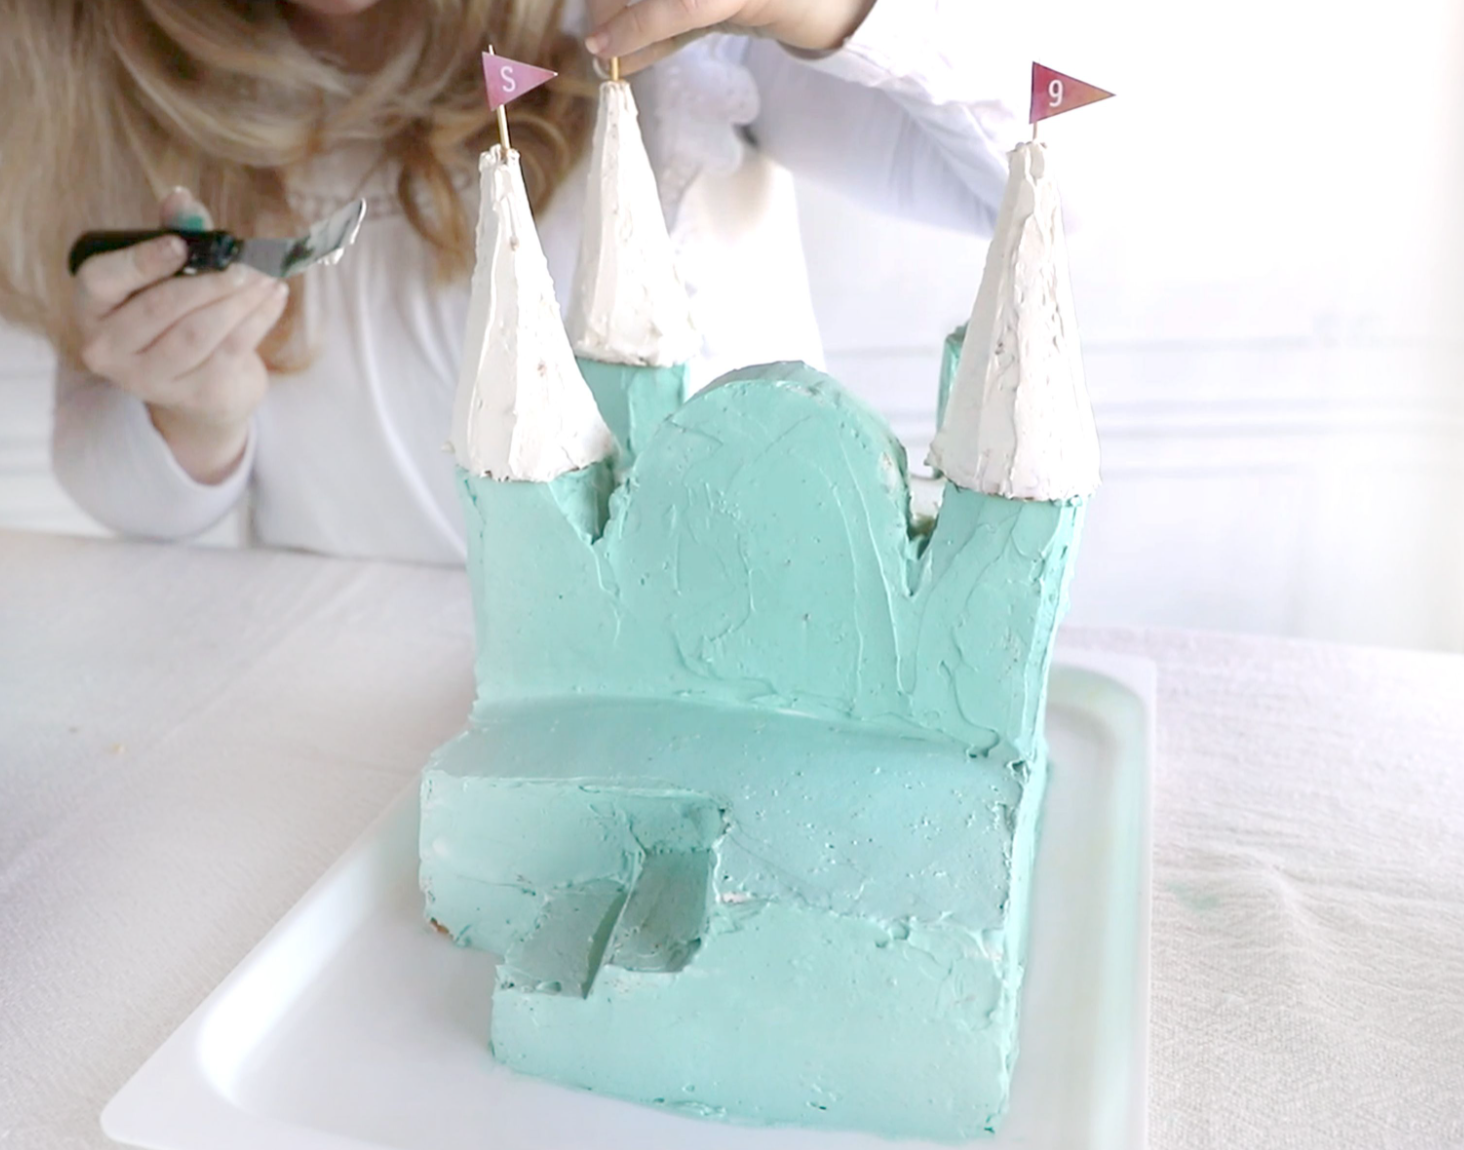
Take your leftover white frosting and your ice-cream sugar cones and cover with the white frosting and place the Printable Mini pennant flags on top (we glued our pennants flags onto a toothpick – we suggest putting the toothpick flags into the cone before you put the frosting on the sugar cone)
Now we will use your wafer biscuit for the castle door. On the top half of the biscuit, cut an arch to match the semi-circle arch we cut earlier and place it on the front of the cake. Then stick on a white chocolate drop with some white frosting as the door handle.
Then take the rest of the white chocolate drops and place them around the base of the white frosted cone towers to give the towers a nice finishing edge.
Then take your nougat and cut it into sections to form the castle balustrade to put along the balcony edge and top edge between the towers.
Take your colorful sprinkles and place them on the top of the castle steps to add a fun pop of color. We also placed some icing on our base to create a path leading to the castle.
Now adorn with flowers randomly all over the castle.
Finally place your SunshineParties Printable Cake Name Banner on skewers and insert it into the cake behind the door arch.
How to create your Princess Fairy Castle Cake from a Store-Bought Cake
Ingredients
You will need:
- 2 x Rectangle store bought cakes
- 1x Blue food coloring (we used gel food coloring)
- 1x bag White chocolate drops
- 4x sugar cones
- 1x bag colored sprinkles
- 1x nougat bar
- 1x packet of wafer biscuits
- 1 x pack of mini swiss rolls
- Variety of mini sugar flowers in mixed colors
- Wooden skewers
- Wooden toothpicks
- SunshineParties Printable Cake Banners + Flags
Instructions
1.Scrape off all the store frosting from the cakes with a pallet knife and place in a bowl for later.
2. Now it is time to cut up one of your rectangle cakes to suit the size and proportion of the castle cake. I have highlighted the cake sections in different colors for you to see how we cut up the cake below. We do recommend drawing lightly on the cake first with a toothpick or skewers, before you cut, to make sure you are happy with the sizing.
BlueSection 1. Discard this section, and use it as a tea time treat while you are making the cake.
Yellow Section 2. Separate this section completely from the cake, cut along the black dashed line, this is to form the stairs you will put back in place later. We cut it into 4 pieces and then cut each of the form pieces down height a little more than each to form the stepping height of the stairs. We only put 2 stairs back on the cake.
Peach Section 3. With this section you ONLY cut along the black dashed line to form the front balcony for this section.
Pink section 4. This section at the back is not cut off but you just mentally separate the back section, so you know how much of the second cake you need to cut off to place on top of section 4.
3. Now to cut up your second rectangular cake. Cut a piece the same size as section 4 and place it on top of section 4 so you can get your back height.
4. You will have left over cake from your second cake. Now with a leftover piece, cut a semi-circle shape and place it on the flat edge, front and centre of the second layer of section 4 of the cake.
5. Take out your mini swiss rolls. Cut 1 mini swiss roll in half and place each half either side of the semicircle you just placed in the front of section 4.
6. Now take two full mini swiss rolls and place 1 full mini swiss roll at the back of each corner of section 4. I would suggest putting a wooden skewer through the centre of each of these swiss rolls for support.
7. Now take the white frosting you have left from scraping the cake clean in the beginning. Place white frosting in between the towers and on top of the arch. Then take about 2 tablespoons of white frosting and keep it aside for icing the white towers later.
8. Take the rest of the cake frosting and add some turquoise blue food coloring. Mix the food coloring in well until you get an even color.
9. Now to place the blue frosting all over the rest of the cake.
10. Take your leftover white frosting and your ice-cream sugar cones and cover with the white frosting and place the Printable Mini pennant flags on top (we glued our pennants flags onto a toothpick – we suggest putting the toothpick flags into the cone before you put the frosting on the sugar cone)
11. Now we will use your wafer biscuit for the castle door. On the top half of the biscuit, cut an arch to match the semi-circle arch we cut earlier and place it on the front of the cake. Then stick on a white chocolate drop with some white frosting as the door handle.
12. Then take the rest of the white chocolate drops and place them around the base of the white frosted cone towers to give the towers a nice finishing edge.
13. Then take your nougat and cut it into sections to form the castle balustrade to put along the balcony edge and top edge between the towers.
14. Take your colorful sprinkles and place them on the top of the castle steps to add a fun pop of color. We also placed some icing on our base to create a path leading to the castle.
15. Now adorn with flowers randomly all over the castle.
16. Finally place your SunshineParties Printable Cake Name Banner on skewers and insert it into the cake behind the door arch.
Well Done! You have created a magical fairy castle cake made of dreams for your little princess! We have a feeling all the other little princesses in the land are going to want this magical castle too!
Don’t forget to add this to your kids party planning Pinterest board by clicking on any of the images included in this post!